dig +trace 输出解读
这几天遇到了一个 DNS 问题,然后在使用 dig 的过程中,很多字段自己只是一知半解,有点模糊,特意抽时间了解了这方面的内容,顺便记录一下。
DNS递归解析过程
DNS 服务器分类:
-
递归 DNS 解析器
类似运营商下发的 DNS 服务器或者像阿里云、腾讯云 dnspod 这种,都是递归 DNS 解析器,其中像阿里云、腾讯云这种对公共开放的 DNS,也称 公共 DNS - 根域名服务器
-
TLD 名称服务器
顶级域名服务器,类似 .com ,.org 这种 -
权威性域名服务器
类似 ns-115.awsdns-14.com. ,会给你返回最终的解析结果给到递归 DNS 解析器,递归 DNS 解析器再返回给客户端
递归 DNS 的解析过程,引用 cloudflare 的示意图,更详细的过程参考 cloudflare文档

dig +trace
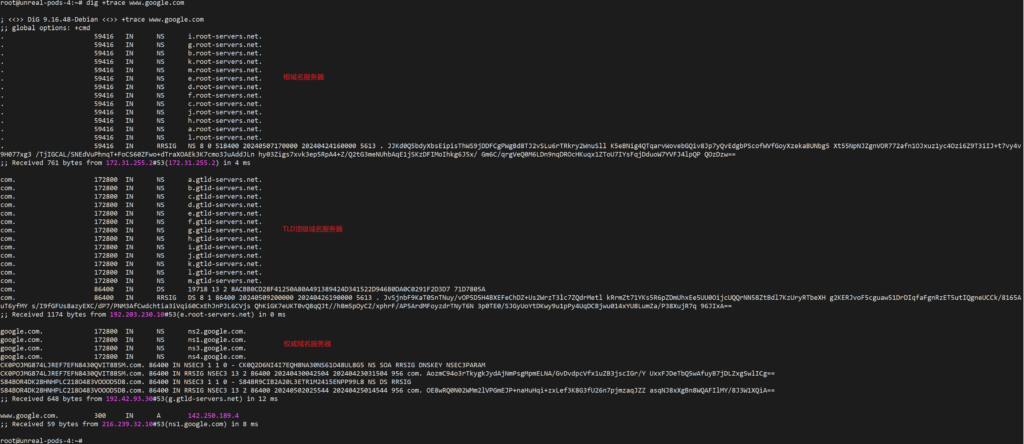
dig 使用 +trace 之后,会从根域名服务器开始,一步一步 trace 整个域名的解析过程
+trace
+trace, +notrace This option toggles tracing of the delegation path from the root name servers for the name being looked up. Tracing is disabled by default. When tracing is enabled, dig makes iterative queries to resolve the name being looked up. It follows referrals from the root servers, showing the an- swer from each server that was used to resolve the lookup. If @server is also specified, it affects only the initial query for the root zone name servers. +dnssec is also set when +trace is set, to better emulate the default queries from a name server.
+trace 追踪的输出
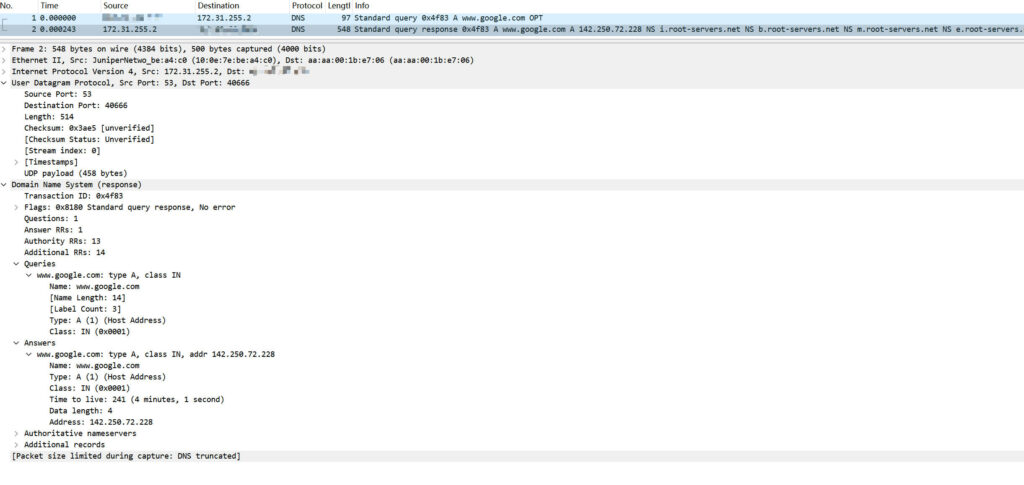
无 trace 参数的输出

无 +trace 参数的抓包结果
其他
-
指定特定的递归 DNS 解析器:
dig @8.8.8.8 www.google.com -
假如命令写成了
dig trace www.google.com,这里 dig 会认为有 2 个域名需要解析,它会发起 2 次的 DNS 查询,记住使用 trace 时一定要+trace -
dig 命令在
bindutils这个安装包里边,找了好多次了,顺便记一下 -
tcpdump 的抓包命令:
tcpdump -i eth0 -nt -s 500 port domain
最后边的 domain 表示抓取域名解析的包